
Managing Compliance in TypeScript Applications

Photo by Luca Bravo on Unsplash
In today’s modern world, application security is crucial. If you are working in the world of open source software development, then it is important to take care of the security and vulnerability of your application or product. In open source development, we use lots of third-party packages without being aware of their security and compliance issues and vulnerabilities.
In this article, we are going to talk about finding and fixing security flaws, vulnerabilities, and compliance issues in TypeScript applications using a very useful tool.
We’re going to use the open source tool, WhiteSource Bolt, for checking vulnerabilities, compliance issues and license risks with packages and libraries in our application. We can integrate this tool with Azure DevOps and GitHub. It will scan and analyze the repositories of your source code and find security flaws in third-party packages as well as in your own code. The best part is it’s not just reporting security and licensing issues but also providing solutions for those issues.
Bolt provides integration with Azure DevOps and GitHub. You can install the extension of WhiteSource Bolt to Azure DevOps and add it as a step in your build/release pipelines. Same way, you can install the GitHub app of WhiteSource Bolt in your GitHub account and it will scan your public as well as private repositories and report vulnerability issues. We'll see this in action in this article.
The way this tool works is that it access to has powerful vulnerability databases, sourcing from the NVD (National Vulnerability Database), GitHub issue tracker, security advisories, and more. It covers most of the vulnerability issues in open source libraries and packages. Bolt supports over 200 programming languages including TypeScript, which makes it ideal for this tutorial. In this article, we will look at how WhiteSource Bolt can be used with TypeScript to manage compliance.
WhiteSource Bolt with GitHub
Now, let’s see WhiteSource Bolt in action with GitHub. I am going to install WhiteSource Bolt in my GitHub account and then I’ll scan my repository, which contains an application developed in TypeScript.
Prerequisites
Before we start installing and configuring WhiteSource Bolt with GitHub, you need to log into your GitHub account and make sure you have at least one repository in it. You also have to enable the Issues feature for your repository. You can do this by navigating to the Settings > Features section in the repository.

Install and Configure
Step 1: Open the official website of WhiteSource Bolt. Click on the GitHub App button and GitHub Marketplace will open in the new tab of the browser.

Step 2: You can see the GitHub app page for WhiteSource Bolt as shown in the picture below.

Step 3: Click on the Set up a plan button. It will scroll down to the bottom of the page and you will see the Pricing and Setup section. Click on the Install it for free button.

Step 4: It will redirect you to the Review your order page. Click on the Complete order and begin installation button.

Step 5: Now, it will ask you to install the WhiteSource Bolt app to access your GitHub account and repositories. You can either give access to all your repositories or only select repositories. I’ve gone with all repositories here. Now, click install.

Step 6: Next, it will ask you to authorize the WhiteSource Bolt app to access your GitHub account. Click on Authorize WhiteSource Bolt for GitHub.

Step 7: Now, it will redirect you to the official website of WhiteSource Bolt and ask you to sign up. Fill the sign up form and click Submit.

Step 8: Once you have successfully submitted the signup form, you will be redirected to a confirmation page on the website. Click on the Go back to GitHub button. It will redirect you to your GitHub activity page.

Step 9: On your GitHub activity page, you’ll see that the WhiteSource Bolt app has pushed a configuration file in all the repositories you have given permission for in Step 5.

Step 10: If you check your repository’s Pull requests tab, you will see a new pull request has been generated by the WhiteSource Bolt GitHub app. It also provides a detailed description about the pull request.

Step 11: If you click on the Commits tab of the same pull request, you will see the configuration file named .whitesource and its contents. It is a default configuration of WhiteSource Bolt.

Step 12: Now, click on the Conversation tab and merge the pull request by clicking on the Merge pull request button.

Step 13: Once you merge the pull request, WhiteSource Bolt will start checking your repository contents. To see this, navigate to the Code tab of your repository. Here, you can see an orange dot as shown in the picture below. When you click on that dot, you can see the status of the security checks. You can see it as in progress in the picture below.

Step 14: If WhiteSource Bolt finds a security flaw or vulnerability in your repository, the security check indicate a failure and you will be able to see a red cross sign as shown in the picture below.

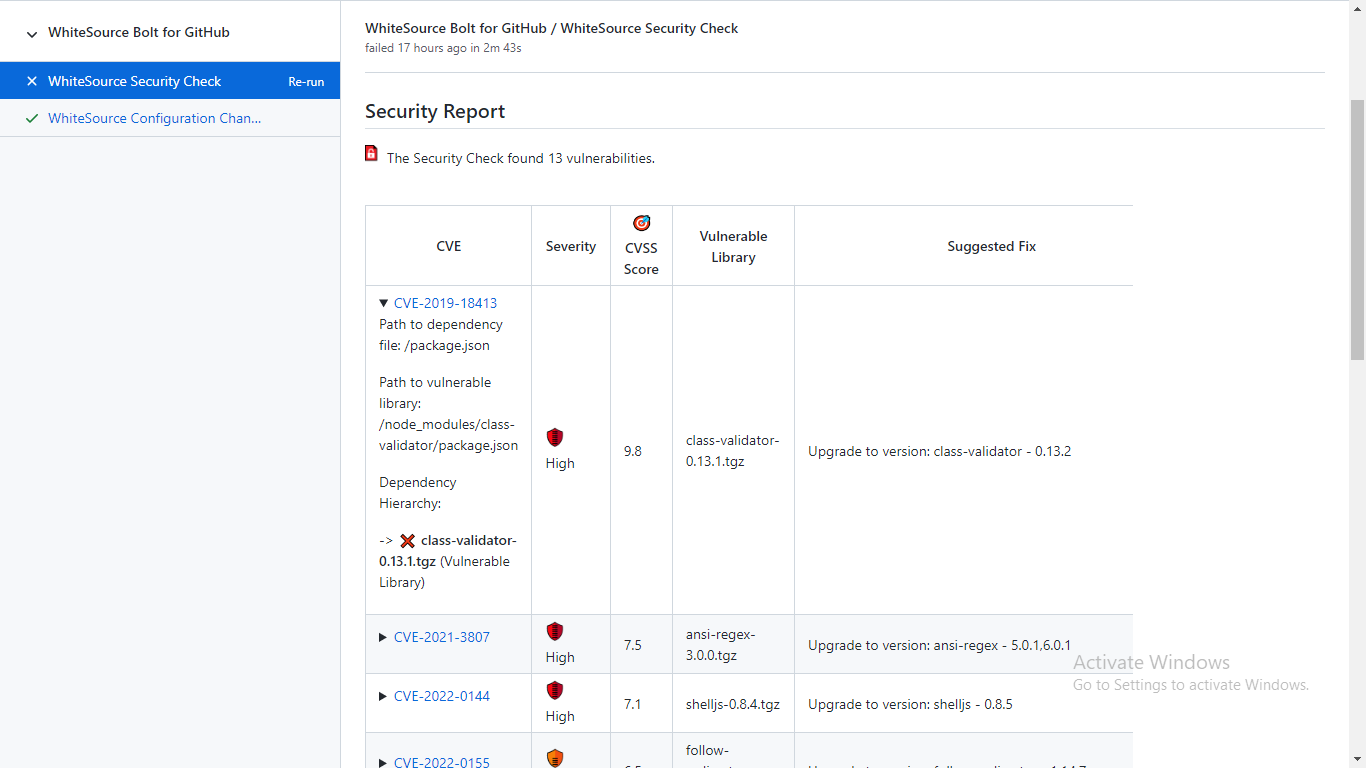
Step 15: Now, click on the Details link in that security check popup. You will be redirected to a detailed Security Report page as shown in the picture below. This report shows you the CVE (Common Vulnerabilities and Exposures) code, its severity, the CVSS (Common Vulnerability Scoring System) score, the name of the library or package in which the vulnerability was found, suggested fixes, and the GitHub issue number.

Step 16: You can click on the arrow before the CVE code to see more detailed information about the issue.
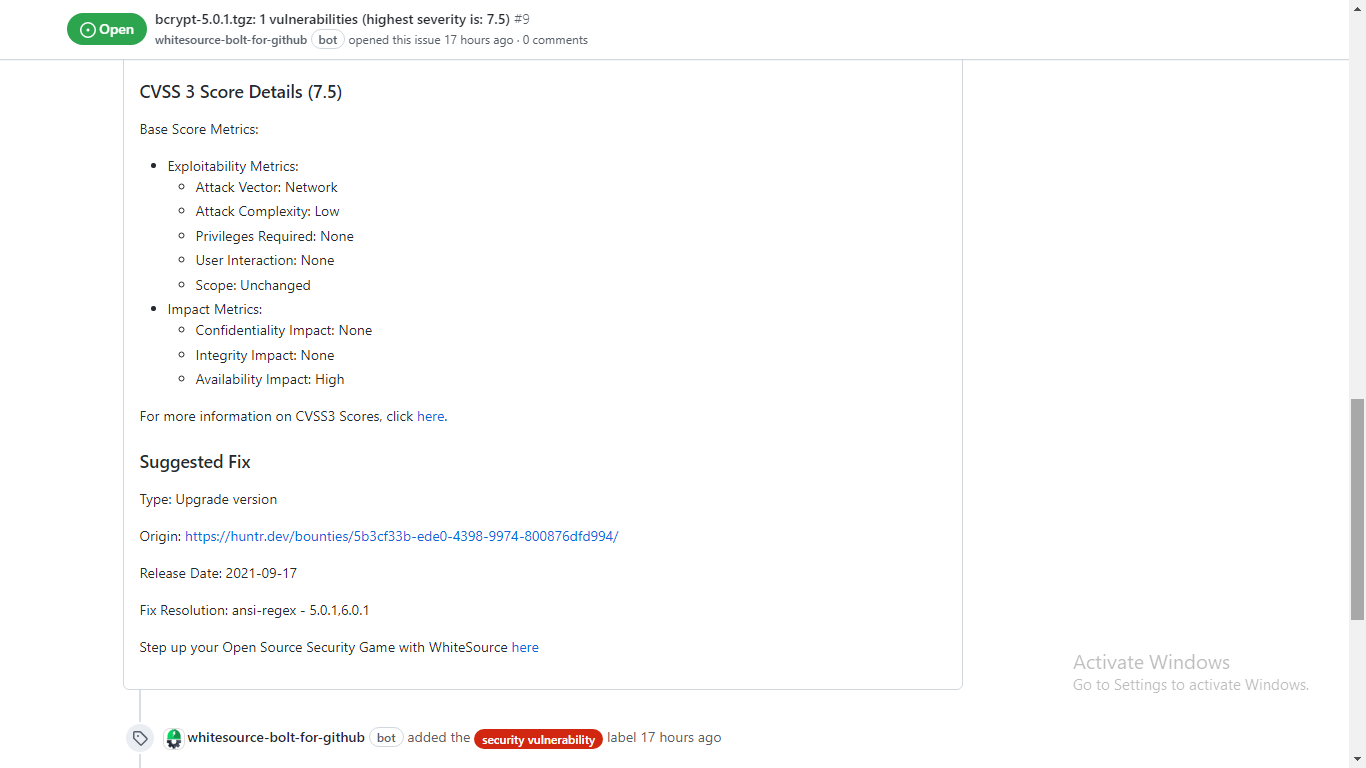
WhiteSource Bolt will create issues for each and every vulnerability found in the repository. You can see all the reported issues in the Issues tab. WhiteSource Bolt will mark these issues with a security vulnerability label.

When you open the reported issues by clicking on it, you will be able to see detailed information about the issues, such as the file name, file path, and commit number.

If you click on the arrow before the CVE code in the Details section, it will show you detailed information about the issue, CVSS score details, and suggestions to fix the issue as shown in the picture below.
Step 17: If you want to know more about the reported vulnerability, you can click on the CVE code hyperlink and it will redirect you to the WhiteSource Bolt website where they maintain a database of these vulnerabilities. Here, you can find more details about these vulnerabilities.

Conclusion
In this article, we covered how you can easily find and fix vulnerabilities in your code using the open source tool, Bolt. You can get detailed information on vulnerabilities in your open source projects and suggestions for fixes and quick remediation by creating issue tabs within your repository and generating alerts on vulnerability components. Basically, Whitesource Bolt helps you get better control on your open source experience. Good luck!