Build Yourself a Weather Forecast App From Scratch Using Only APIs

In this article, we will build our own weather app using a weather API. This small project is great if you’re looking for a quick app that can give you daily or weekly forecasts for a specific location.
The key things we will focus on in this post are how to take weather data for our application and how to publish the application in production, live on Heroku.
That's why the application is built only with HTML, CSS and JavaScript and a simple NodeJS server built with Express. In order to focus only on what interests us, we will start from an already built interface, and we will have to write the logic that takes over the weather data and displays it.
The code is available to download from Github. In that repository, you will find two folders; finished and unfinished. Inside the finished folder is the application we’ll build and inside the unfinished folder is the UI built with HTML and CSS from which we’ll start.
At the same time, all the resources we will use are easily accessible and they are available for free.
Let’s Start Building
The application we’ll build looks like this:
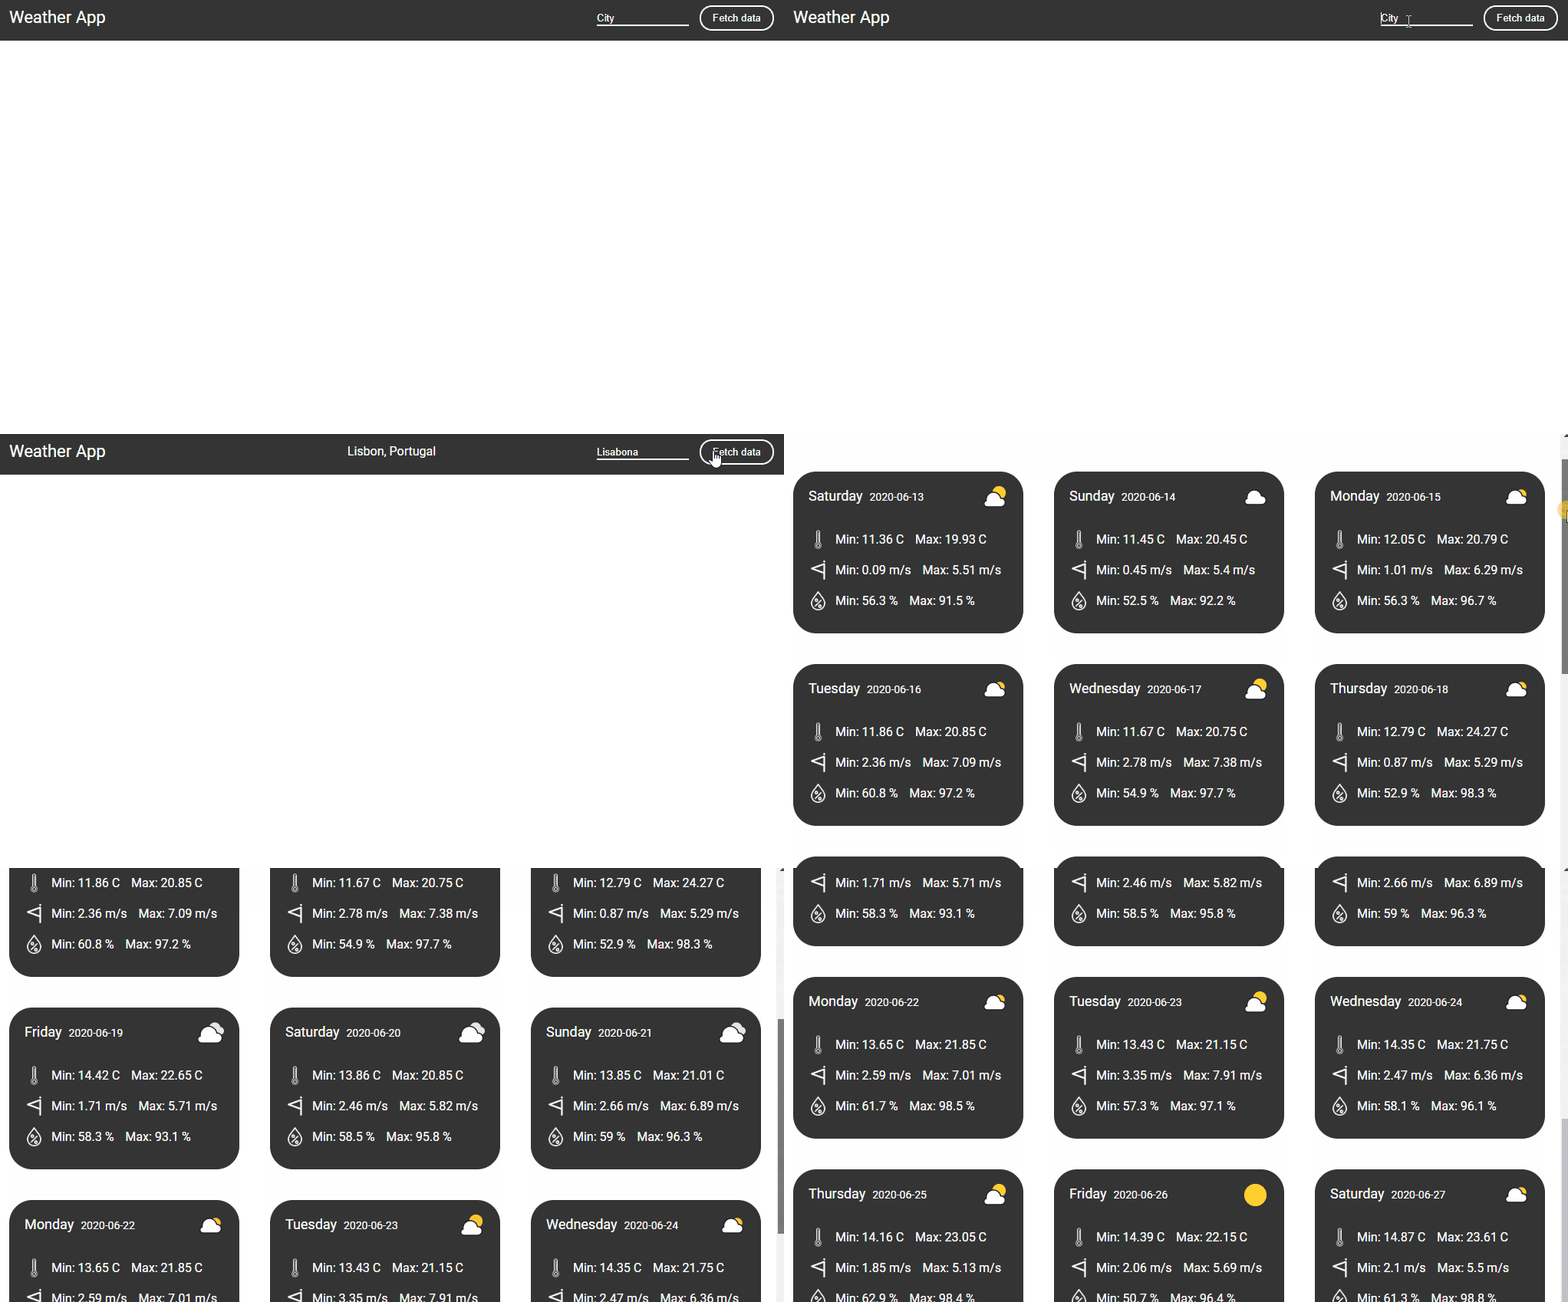
Based on a given location, the application will show the daily forecast for the next days including:
temperature
wind speed
humidity
icon based on the weather code (clear, rainy, etc.)
The application diagram looks like this.
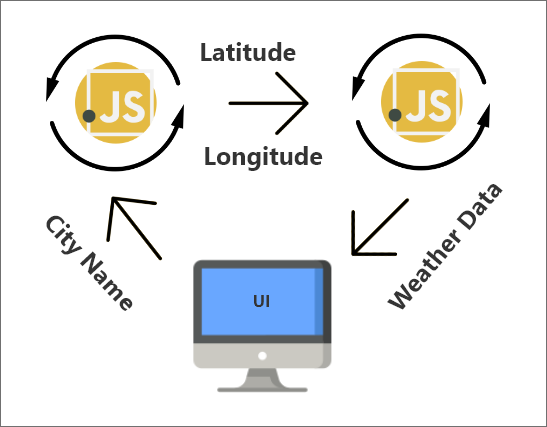
The user will enter the name of a city, then the application will search for that city and will take its geographical coordinates (latitude and longitude). Using these coordinates, it will take the weather data from the ClimaCell API.
To get latitude and longitude starting from the name of the city we’ll need to use a Geocoding service. For demo purposes, we’ll use the API from OpenCage.
The first step we need to do is to set up the project and create an account on both ClimaCell and OpenCage to get an API key.
I. Setting Up the Project
Download the code from Github
Run
npm ito install the dependencies (Express)Get your API keys for ClimaCell and OpenCage and write them inside
index.jsfrom theunfinishedfolder
window.onload = function () { const OPEN_CAGE_API_KEY = ""; //"<your_opencage_api_key>" const CC_API_KEY = ""; //"<your_climacell_api_key>"};Run
node server.jsand open a web browser on port8080.
II. Write Geocoding Service Code
The second step is to write the code for the Geocoding service. Based on a city name, it will return its geographical coordinates.
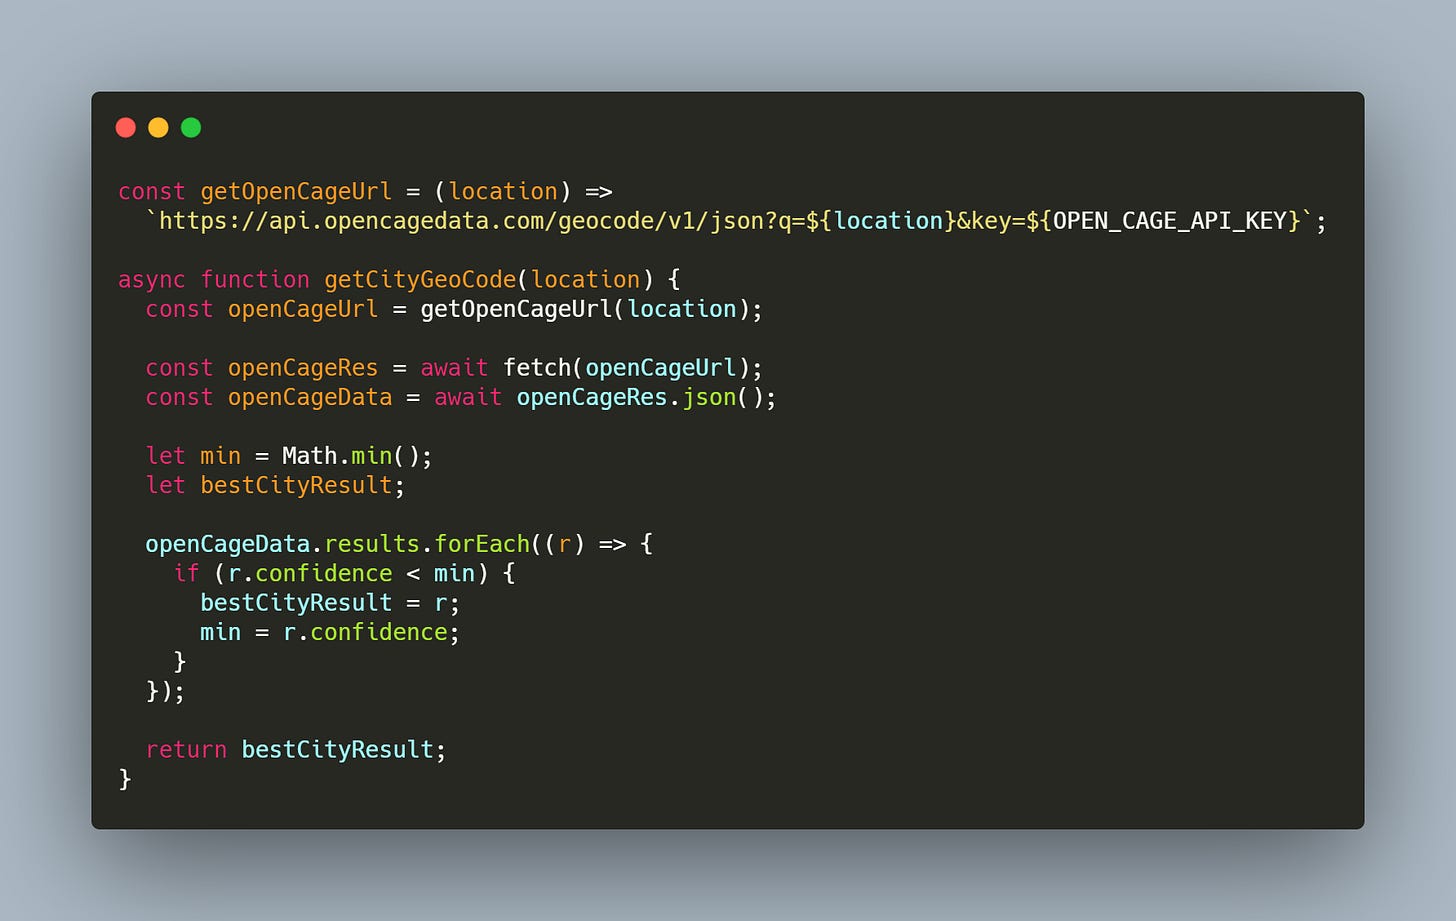
The function getOpenCageUrl is used to return the formatted URL for OpenCage using a location and the private API key.
The second function, getCityGeoCode will make a request to the API and give you the result that has the best confidence score.
The object openCageData has the following structure:
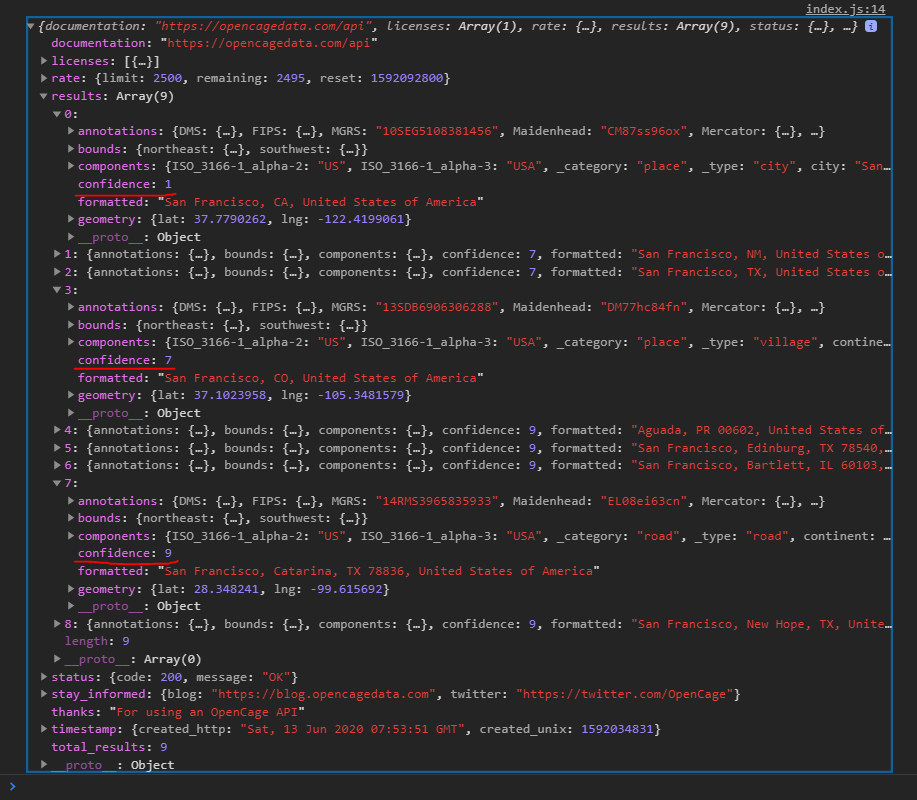
Inside the results property, we have an array with multiple possible location based on the location we supplied.
As you can see we have a confidence score for each object inside this array, and we want to return the result which has the highest confidence.
III. Get the Weather Data
The third step is to acquire the weather data that we are interested in. For this app, we will be using the ClimaCell Weather API. This API is handy for building all kinds of weather apps, from small personal projects up to enterprise ones.
In our case, the data we need is:
temperature
wind speed
humidity
weather code (rainy, cloudy, clear, etc…)
ClimaCell have a list with all the possible weather codes and a repository with the related icons for these weather codes.
These icons are already downloaded and placed inside the folder: assets > images > summary icons.
The code for ClimaCell is similar to the one we wrote for OpenCage.
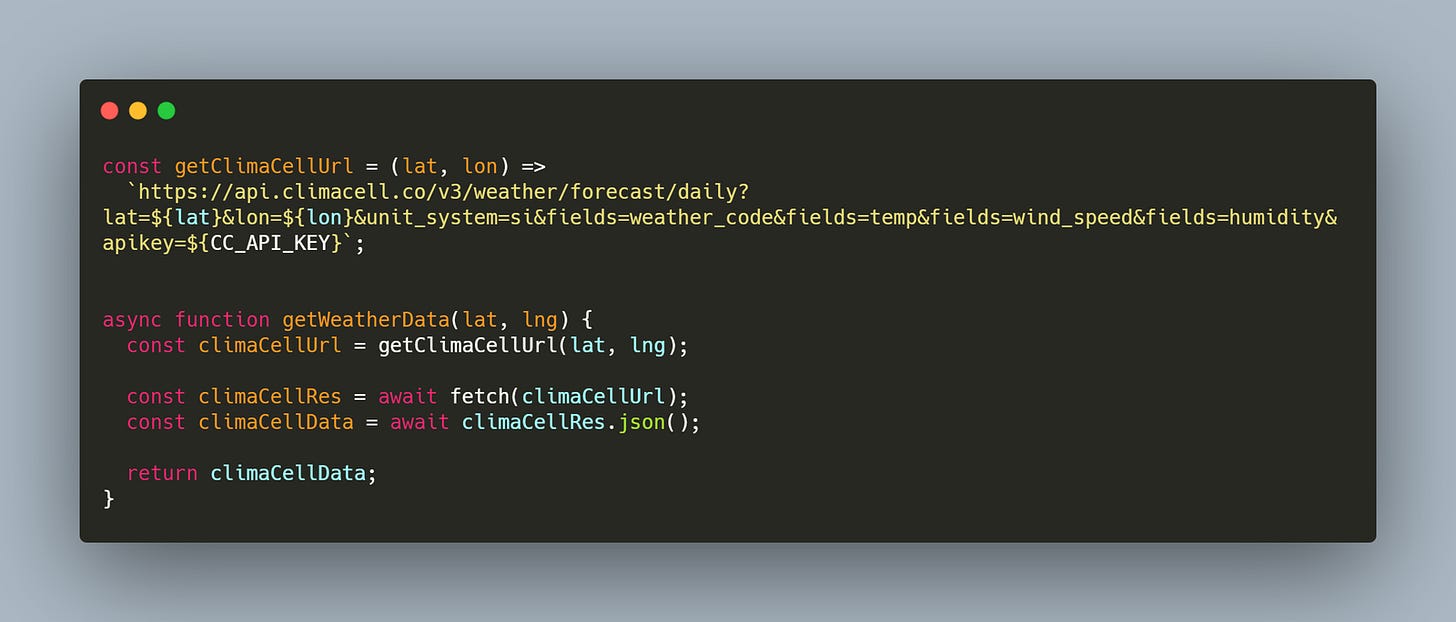
We have a URL builder getClimaCellUrl based on a given latitude and longitude with the desired data we want to acquire, formatted in an array named fields.
The data returned from this function, getWeatherData has the following format:
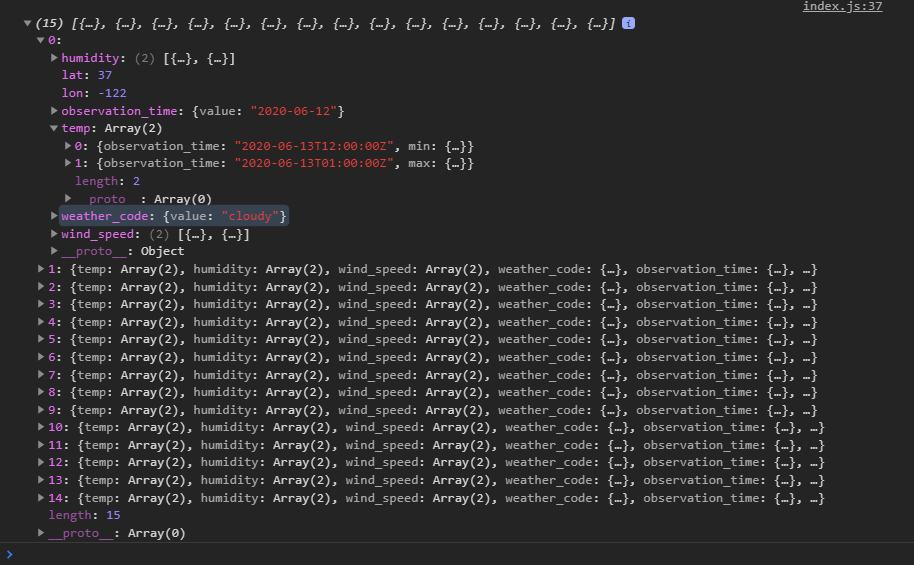
We have a property weather_code which is an object and we’ll use it to show the related icon.
At the same time we have humidity, temp and wind_speed which are arrays of objects with a length equal with 2.
The first object is the minimum value and the time at which it will be reached and the second object is the maximum value and the time at which it will be reached.
In total we have a daily forecast for the next 15 days.
IV. Show Data on the UI
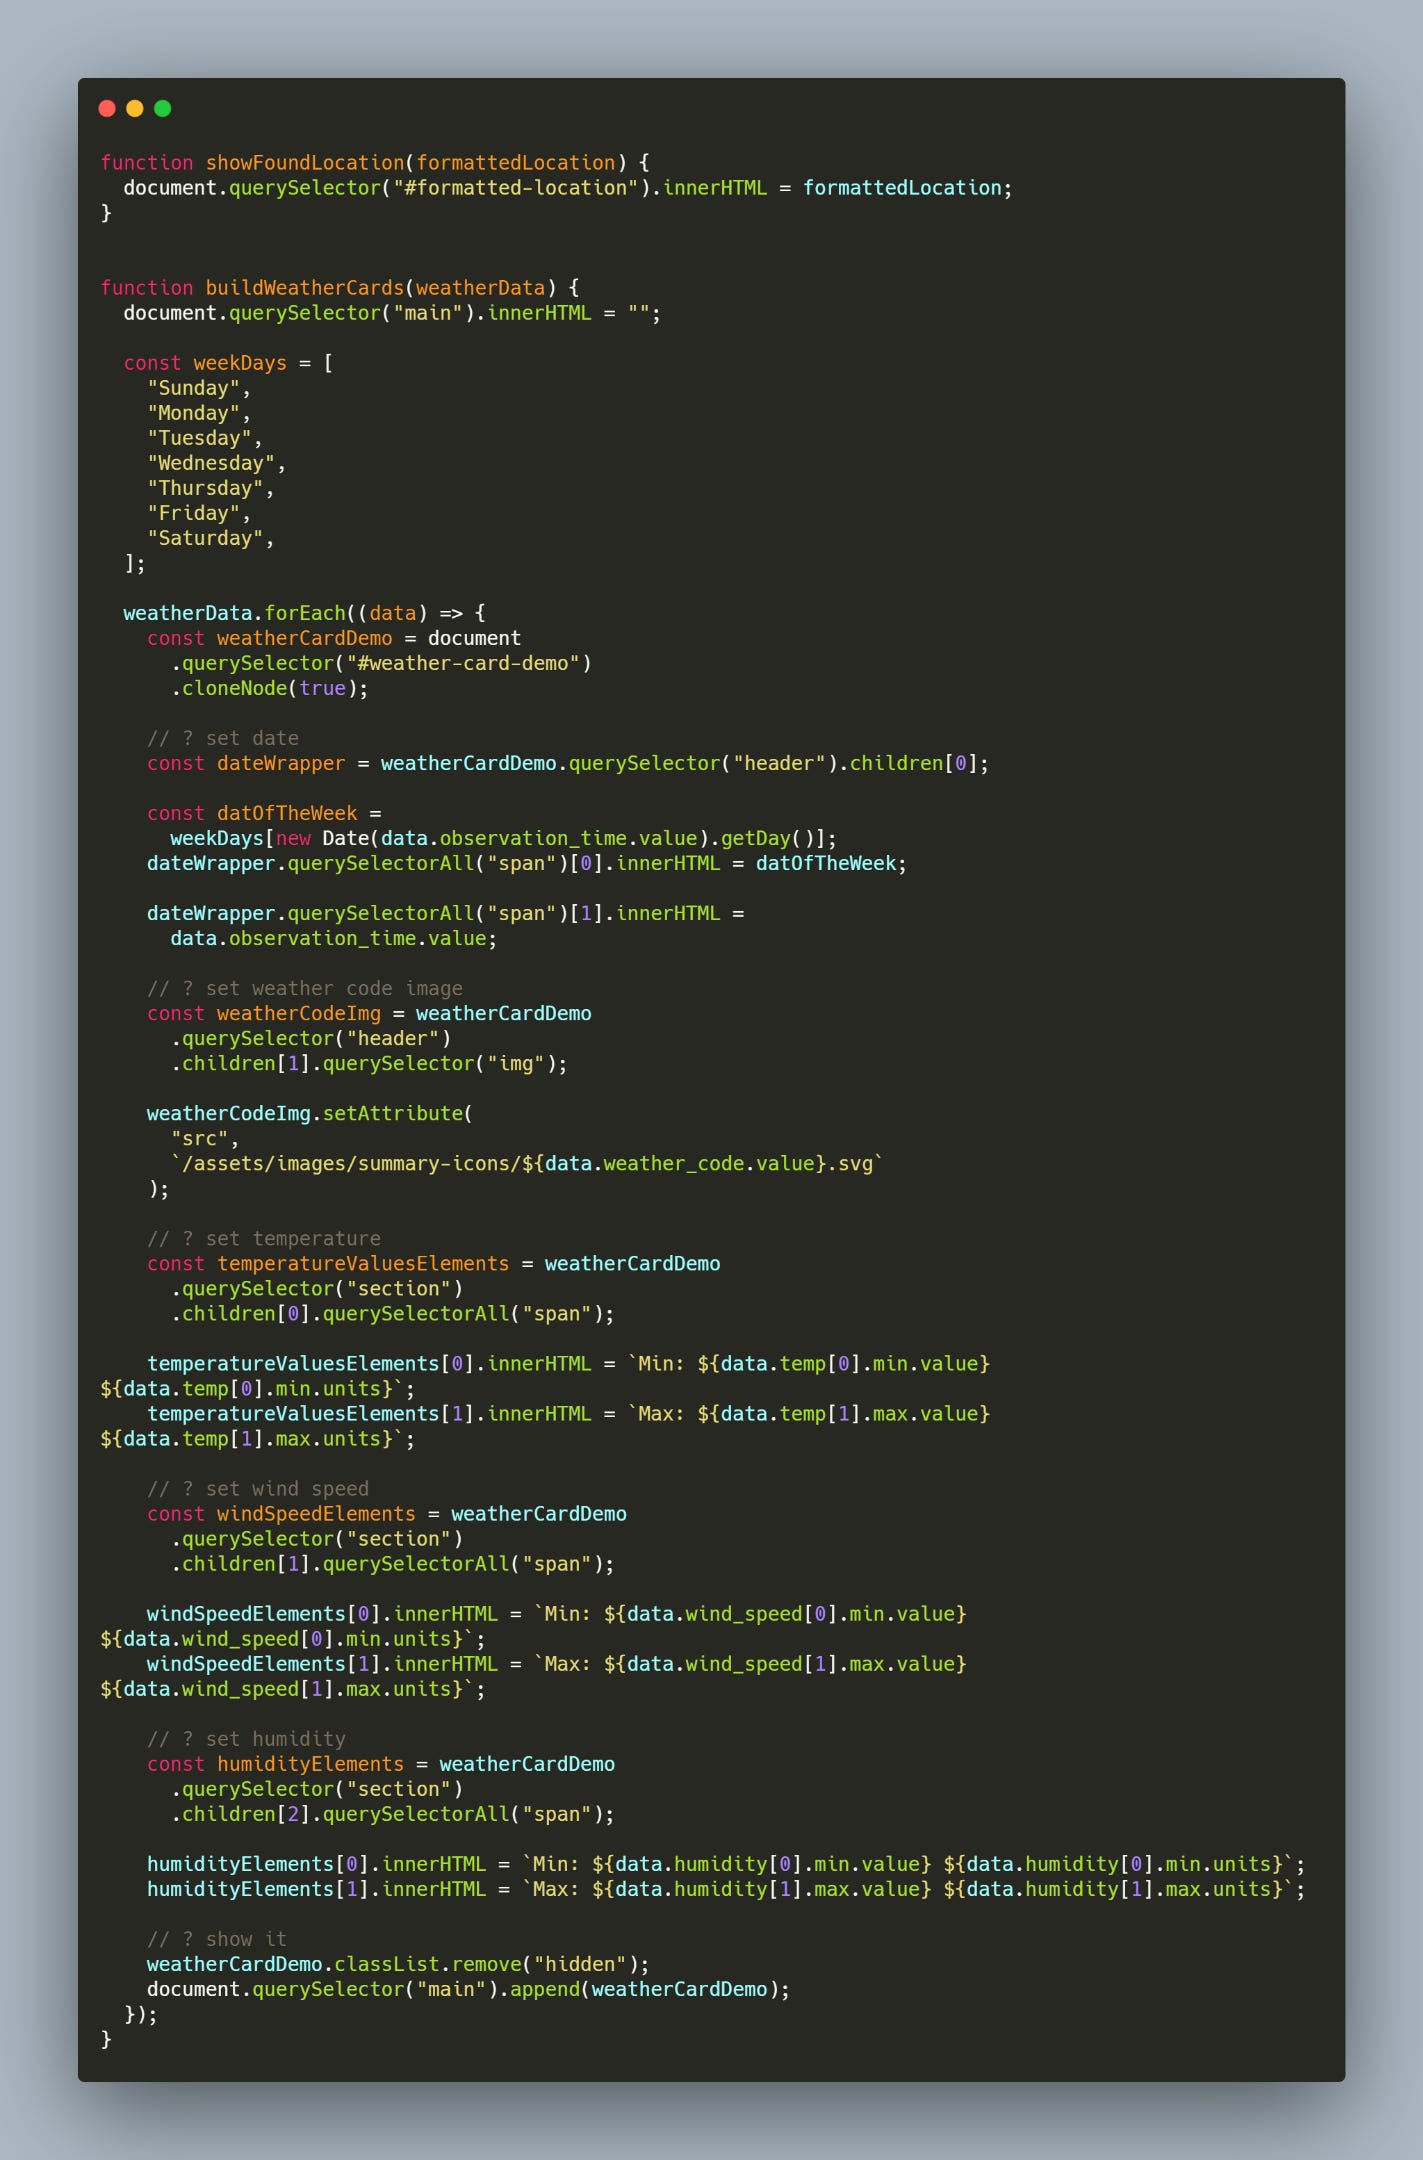
The fourth step is to display this data on the interface.
Show the location in the toolbar

Build the weather card
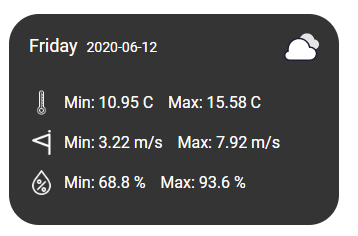
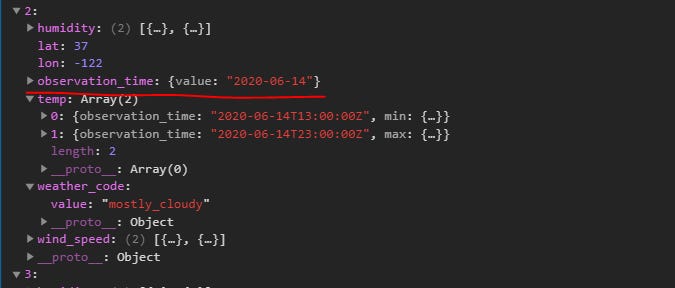
To display the date we will use the higher level observation_time property.
When we build the weather card, instead of building each HTML element one by one, we’ll use a boilerplate which already is present in the file index.html with the id of weather-card-demo.
In this way we’ll clone this HTML Node and replace its content.
The code for this step is straightforward and should be treated as such. This code is done in the HTML format of the card.
V. Event Listeners and Main Function
Lastly, we need to bind the event listener on the UI and wrap the logic inside a function.
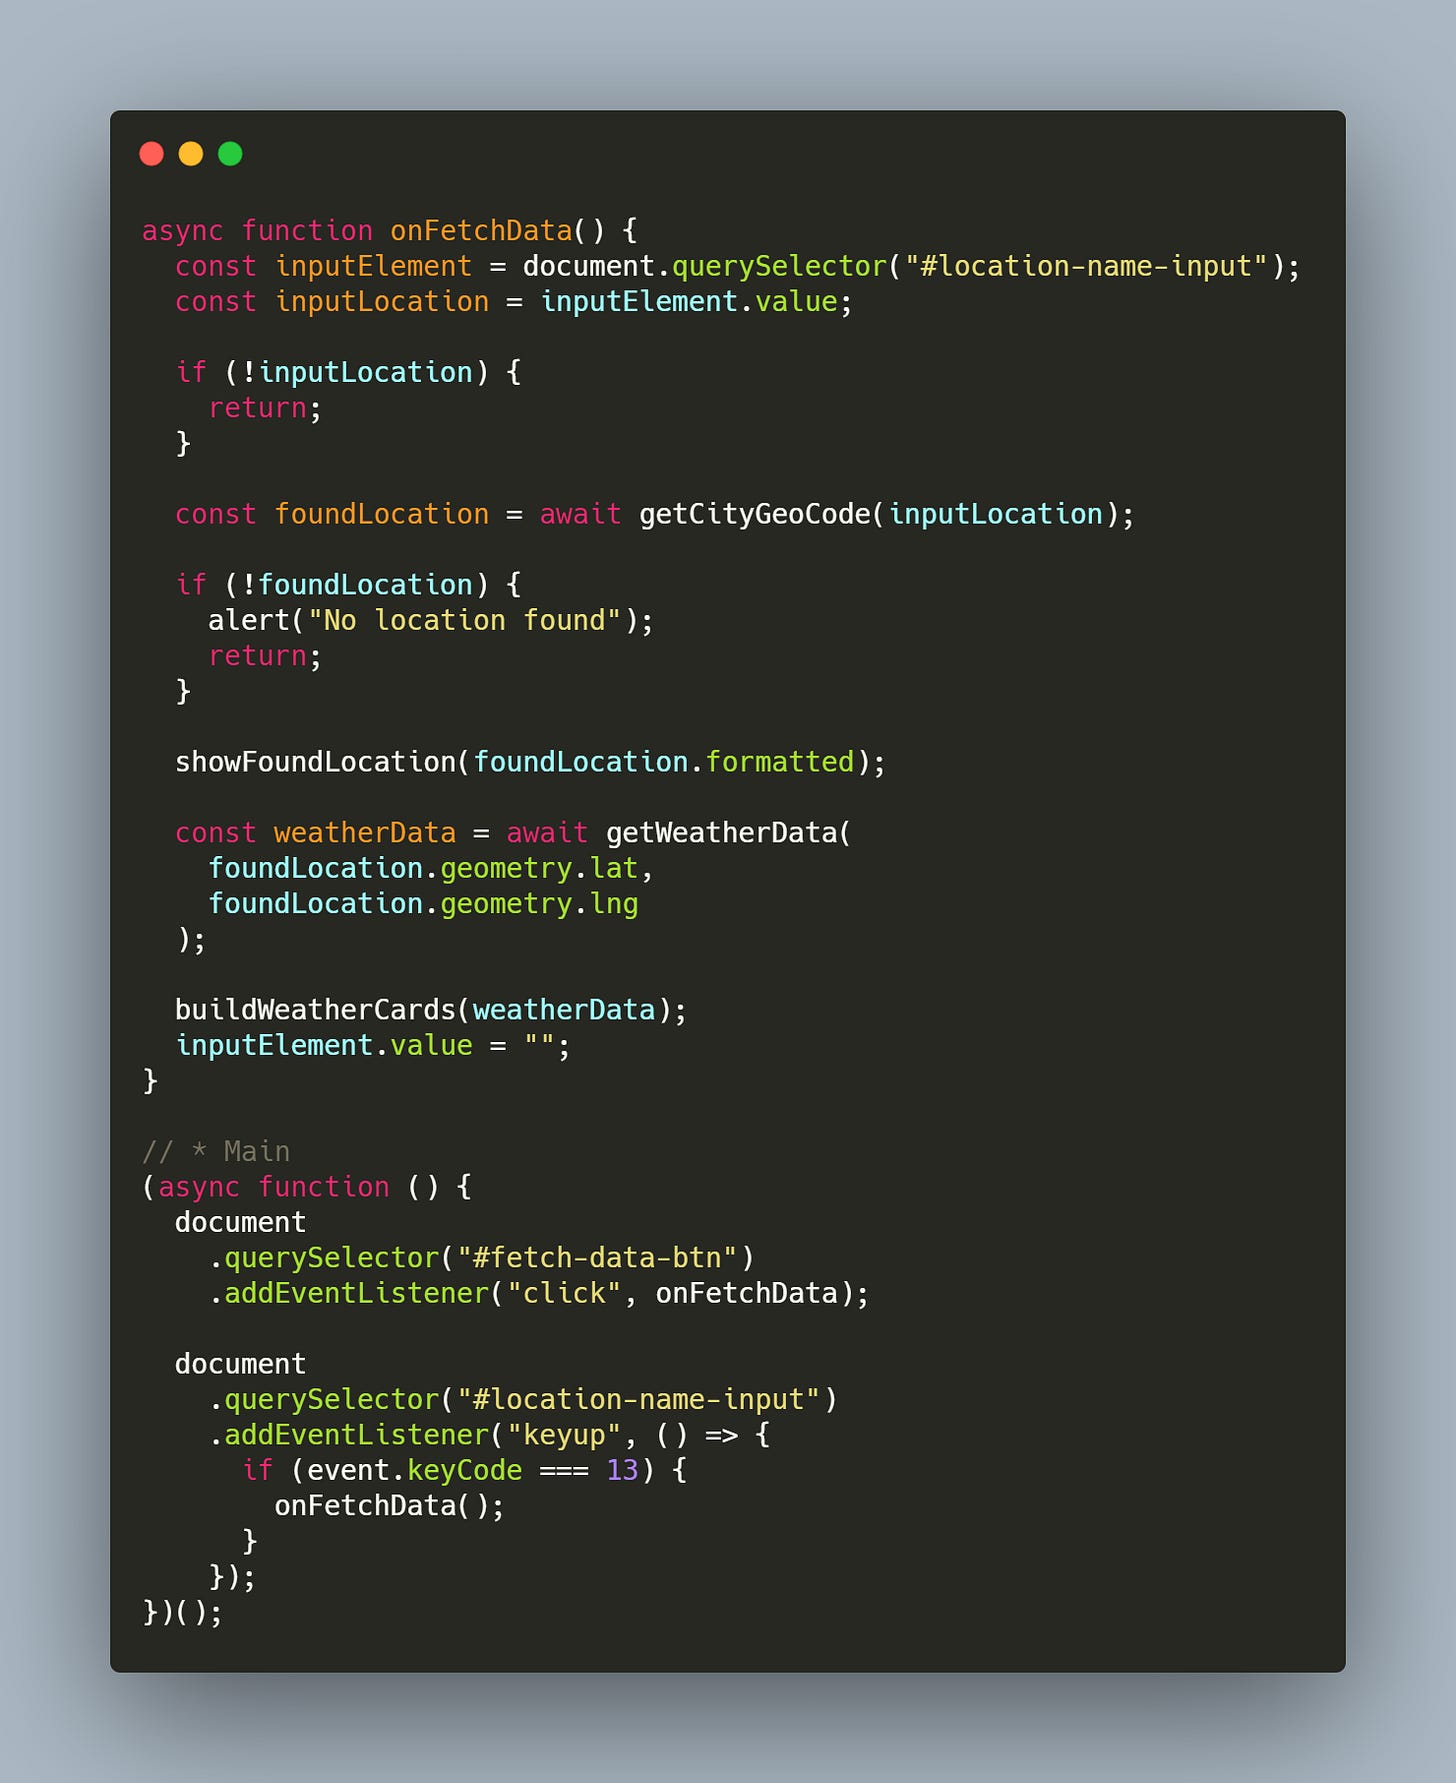
onFetchData is the function in which we wrapper the entire logic of our application, here we get the value written by the user and then call the APIs to acquire the desired data.
We call onFetchData when the user clicks on the button Fetch data, but also when the Enter key is pressed inside the input where the user writes the name of the desired location.
VI. The Deployment
To wrap up, all we need to do now is to deploy our code.
We’ll use Heroku, because it’s easy to use and it has a free plan also.
For this we have created two files:
server.js- a NodeJS server using Express to serve ourindex.htmlfile andProcfile- used to inform Heroku what command to run, in order to start our application
All we need to do now is to upload our code on a Github repository that we have access to and then to connect our Heroku account to our Github account.
Conclusion
In this example we saw how to acquire basic weather data, but there are many other possibilities you could play with, including adding air quality data. So feel free to explore the ClimaCell weather API and use it according to your needs.
At the same time, if you prefer another deployment server, rather then Heroku, something like GitHub Pages or Netlify, then you can simply change the Procfile and replace it with the settings required by your preferred cloud service.
